3 Steps to Creating Flawless Drawings with CAD
Computer aided design (CAD) started around the mid-1970s, as technologies became capable of doing more than merely reproducing manual drafting with electronic drafting. Computers also started to become more affordable thanks to mass-produced silicon chips and the development of the microprocessor.
With companies beginning to see the cost benefit in switching to CAD, Autodesk released AutoCAD in December 1982. By March 1986 AutoCAD had become the most ubiquitous CAD program worldwide, and recently AutoCAD 2017 marked the 31st major release of the world’s most popular CAD program.
While 2009 saw a huge drop in the yearly upgrade/purchase numbers, down 1.25 million from 5.47 million in 2008 to 4.22 million, recent figures have been more reassuring. Jon Peddie Research (JPR), a market watcher that tracks the design software market, says the CAD market is growing again.
“Jon Peddie Research estimates the CAD software market to be an $8 billion market with 5.15 million annual users. We expect the market to grow to $8.7 billion in 2017 at a CAGR of 4%.”

Data from JPR’s 2014 CAD market report, shows Autodesk leads the pack at 29%. [Source: DeskEng]
Early Days of AutoCAD
In this article we’re going to provide some tips to help you create flawless design documents in CAD. First, Steve Wild, Director of A4 Plus Limited remembers the early days of AutoCAD adoption.
“Many years ago, when I used to sell AutoCAD (which was THE package for electronic drawings), I was up against the argument that preparing drawings on CAD would prevent ‘flair’ and ‘style’. People were worried all drawings would end-up looking ‘vanilla’ or ‘out-of-the-box’, and that the skill of the draughtsman would be lost to the efficiencies of computers.
Back then, I was somewhat sympathetic to these objections. In time though, I came to realise it’s still very easy to create awful CAD drawings, lacking in standards, consistency, clarity, and any kind of quality.
When companies were transferring from manual, traditional technical drawings (on drawing boards) to CAD, the software was considered as nothing more than an ‘electronic’ drawing board. Nowadays, of course, the software has become so sophisticated, so powerful and so useful that to categorise it in the same way is simply criminal….and, wrong of course.
Many companies, understandably so in tough economic times, got rid of their draughtsmen and women in the safe knowledge that drawings were just a ‘click’ away on the old keyboard……’surely equivalent, and nothing more complex, than pressing the copy button on the photocopier’ I often heard.
Consequently many draughtsman and detailers were dropped by companies in favour of the design engineer, who became the so called ‘master’ of CAD and as he can produce his own drawings, ‘why bother employing draughtsmen/detailers/tracers at all’?
The problem being that the dear old design engineer was very used to, and happy with, his team of draughtsmen churning out decent drawings and in some cases wasn’t too sure what made a good drawing.
The point being, you still need the knowledge and skill to be able to generate flawless drawings, especially those used for manufacturing parts.”
Who Needs Drawings Anymore?
There’s an argument that, as everything’s done using CAD/CAM, there’s no longer a need for drawings. Certainly 3D CAD models being used directly for manufacture is common practice, however it’s not always possible.
We’ve seen circumstances where; manufacturers aren’t technically able to use 3D CAD models, the complexity of part doesn’t warrant it or the manufacturing process isn’t suited to that approach.
Drawings are also used for quality control (QC) purposes and referred to when inspecting parts dimensionally once made.
Whatever the reasons, we’re producing drawings each and every day for customers, so it’s certainly not dead.
3 Steps to creating flawless drawings with CAD:
CAD is the tool used to make drawings and design documents, which means it’s only part of the drawing creation process. The other part is the person who’s telling CAD what to do. And as we know people make mistakes, to err is human after all.
So here are some tips to help reduce errs (errors) in your drawings:
1. Set Personal / Company Based Drawing Standards
Create checklists which include a thorough list of what you need on each type of drawing. Printing off several drawing sets and reviewing can be a good place to start.
You can also include general information, such as how to fill out your title block, basic annotations for each sheet, notes, details etc.
This should then be applied to every project. It’s vital you stick to them, QC against them and are consistent.
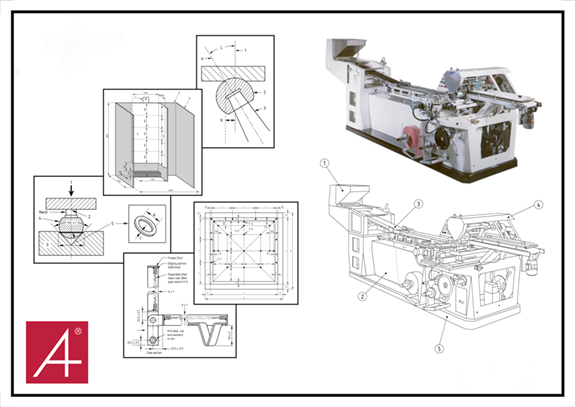
2. Pictures Paint a Thousand Words
Drawings transcend language barriers, so where possible use less words and more symbols and numbers.
You can also describe with pictures, so if the feature or shape of a part isn’t clear then provide an extra view or sectional detail for clarity.
3. Quality Check
A quality check is ideally done by at least two people.
First is the self-check. Print out your drawings, go through your checklist and mark anything that’s wrong. Anything that’s missing write it in, sketch it in, draw it – whatever it takes to ensure those items get on your drawing. Revise your drawings and repeat.
When you’re happy with it, pass to whoever is reviewing it next. They should be considering;
- Can I make this?
- Do I understand the shape?
- Is there enough information for manufacture; dimensions, finish, material etc
- On assembly drawings – can I find every part in the parts list which makes this assembly? Also, do I have parts left over ie not shown on the assembly drawing?
Things to Look Out For When Creating CAD Drawings:
- All drawings should be created to British Standard 8888
- Avoid double dimensioning i.e. dimensioning the same feature in two ways on the same drawing
- Do not dimension to hidden lines, use sections and dimension to solid lines
- Use cross hair centre marks on holes to dimension too – not just a line going perhaps somewhere near.
- Don’t dimension on the part – place dimensions away from the part
- Neatly stagger stacked dimensions
- Be consistent – especially with text font and sizes on tolerances and dimensions
- When sectioning views use a clear hatch type and scale – often hatching can confuse features, such as holes, if badly selected.
- Datums – carefully select and be consistent.
- Avoid sequential dimensioning as this will cause tolerance build up
- Tolerances – unnecessarily tight and the cost of manufacture increases – too slack and the part may not fit / perform its intended function.
How We Can Help:
We’ve been producing drawings for customers for more than 25 years, working with companies of all sizes, from start-ups and SME’s to multi-nationals, so we truly understand the processes and challenges involved at every stage.
If you’re interested in finding out more about how our services can help drive your business forward, get in touch with our experienced design team today.